 home coil info products ordering
construction tips for microwands
8/14/2003
Finished putting together a batch of 25 of these "microwands" today, using silicone seal.
Some observations:
When putting on the caps, I first spread a little seal all around the pipe near the edge, then twist the cap as I slowly push it on, to make sure I get coverage all over. Then, it is important to let them cure well, as they will be pressurized in the next step.
When putting on the second cap, they usually want to slide back up due to the air pressure. If I push them down another time or two, "screwing" them on, they usually stay. I had one recalcitrant little bugger require about 5 or 6 attempts, though.
I had about 4 of them leak a bit under pressure from the lower caps as I forced on the top ones. I set these aside. Evidently the seal, despite my attention to detail, is not always reliable.
After these dried off, I smeared more seal around the middles of the units. In fact, I went ahead and did this to most of the batch, as I could not be sure the TOP caps were completely sealed, even if the bottom ones had withstood pressure.
This is a hassle. In fact, it was some work making these. I was able to get the caps @ 12 cents each if I pre-ordered them from the store in bags of 25. Each unit was in its own plastic bag complete with barcode and stylized M symbol, so I had to tear open 50 little bags, extract the caps, scratch Xs on the inside and outside of each with an awl (that's 100 Xs), glue a cap on each of the 25 little pipes -- and the hardest part was cutting all these to length -- and set them down to cure.
I came back a couple days later, filled each about 3/4 full of 1st generation MW water, glued the tops on, and sealed them more around the middle.
Whew! The good news is I have 25 of the little guys now. But there may be a better way to do this. If you can get plain, unmarked caps loose for a good price, you're a bit ahead of the game.
Update:
There may be a better glue for this. Sally recommended Welder brand, available at Wal-Mart, which I have been using lately. Seems a bit better, but is also toxic.
One can also make these out of large bullet shells.
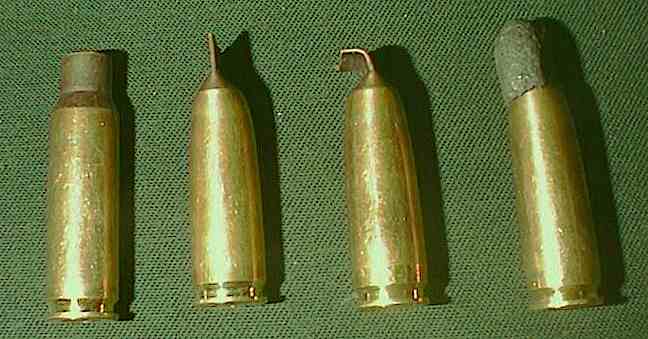
From left to right:
1: empty shell
2: filled about 2/3 with Medicine Wheel Water and glued. Be careful to keep the top part dry inside; wipe with Welder glue using Q-tip. Wait 5 minutes and squeeze shut with suitable pliers. I then use Vise-Grips to squeeze top real flat. Let cure standing upright for a couple days if possible.
3: end turned over; not necessary if you are going to cast it, but here I was just globbing epoxy putty on (PC Weld is what I used, from hardware store; I think the formulations they have for metal or plumbing contain metal). 4: finished unit
Loohan