 home coil info products ordering
Loohan Communications Office
Orgone Technical Bulletin #21
April, 2007
Grid Blaster
[Note: Don't be intimidated. The first few units are much more complex than necessary. As you go down the page, you will find much easier-to-make units. Better yet, read OTB 32 first.]
April 2, '07: I finally made good on something I said years ago in OTB 2:"I'm thinking of taking an extension cord, coiling it into a caduceus or mobius shape, and casting it in orgonite, such that both terminals are left outside the orgonite and appliances can be plugged in."
And man, does it kick butt. It's insane what a relatively modest amount of orgonite can do under some circumstances.
 I took a 95-cent 9' extension cord, separated the strands in the middle, and made a mobius out of each one. I don't particularly advise this, and won't do it again if I want to cast each mobe in a separate mold, because the insulation is so thick it makes it a hassle to make the cords come out the sides so that the 2 disks can be glued face-to-face. Especially if you leave only a short distance between them like I did.
Nevertheless, the project turned out real well.
 I taped the 2 discs together. That way if I want to sandwich something between them down the road, no problem.
This is an application of bucking energy (OTB 10).
Due to perspective, it appears as though the top part is larger in this pic, but actually both halves are the same size.
As molds I used quart yoghurt containers, which I had to cut short due to the short run between the coils. Then I had to cut away notches in the sides of the molds for the wires, and tape them so that the resin stays in.
First I poured about 3/8" of clear epoxy in each mold and subjected that to intense positive energy as it cured. This clearcasting is not necessary, but greatly enhances the energy of the unit. After that set up, I put steel shavings in one mold (with a tiny bit of aluminum) and nice shavings in the other.
Why? I seemed to recall Rob in NY once mentioning that he made an orgonite egg with one half of it steel and the other brass. He set it on his electric line, and claimed that his electric bills from that point were like a fraction of what they had been. Be that as it may, I dowsed that using these 2 metals like that sure would make for some wonderful energy.
 Out of baling wire, I made a 26.65" SBB coil with ends upturned, and put it low down in with the steel. And another one out of copper went in with the brass.
Like the pic, but with 3/16" or so of the very ends upturned toward the viewer. That's how they should look, directionally, when looking down into the mold.
Even a smaller, single-strand coil would be OK, or none, but they do help a bit.
I put in the mobius coils, added some crystals (quartz, selenite pieces, a small piece of danburite) inside the coils, more metal, poured, subjected the epoxy to more programming as it cured.
I added a pinch of antimony in the centers in the final layer.
The halves came out mighty intense. Yes, it is possible to make real good orgonite out of lathe turnings.
I posted about my initial impressions.
Part of the reason this is so important is that the greys, according to Kneweyes, tend to use the grid as a route to hassle people lately. I'm 500' away from the grid at home, so they just thumb their noses at me from Zeta 2 Reticuli and its 4 planets occasionally. But it's amazing: I live 3 miles away from where the unit is pugged in at town, yet it neutralizes the fridges, etc. of my neighbors out here.
I do not know yet whether it affects utility bills, but if it does, it might well affect hundreds of customers.
I'd like to start a fad of people making these things. I have dowsed some parameters for optimum effectiveness, and in a few days hope to make an even better one.
The unit seems to work best when you have an appliance plugged into it that is always on, even if only a tiny trickle, like a clock or small adaptor. Since the cord I used is only 18-gauge with no ground, I would advise not using the unit with anything that sucks a lot of juice.
April 13, '07: I am working on gridblaster #2 this Friday the 13th, with mobius coils that are not made from extension cord wire this time. I am still using 18awg wire for the coils mostly for exta safety margin, in case someone plugs in a medium-sized appliance.
Incidentally, I am not an electrical engineer, this device is not UL approved, and you are reckless if you do anything I suggest. Don't sue me if you blow yourself up.
Also note that you do not absolutely have to make these things exactly as I do. The basic concept is pretty simple. I am just doing what I dowsed would be the best within the parameters of my available material resources and imagination.
A few of these ingredients may not be to hand for you; don't sweat it. I figure with all this attention to detail, my 2nd unit should be about 15% better that the original.
I think the bit about the steel and brass is important, but if that's not feasible you can probably still make a device that has a great effect. Try 2 different metals, if possible. Intuit your own ingredients, coil sizes, etc.
Apache tears or other nice obsidian is what I dowse as the best stones I can think of to put in the coils. Also selenite pieces help in the steel portion. Water would not be an asset. If you can't easily get obsidian, quartz is pretty good too.It is advantageous to design it so that the steel side drives its energy more strongly into the brass side than vice-versa. This could be accomplished by putting a smaller SBB coil in the brass side, and or positioning the selenite or quartz in the steel so that it directs the energy toward the brass.
Nonetheless, it is also advantageous to make the brass "half" somewhat larger that the steel one.There is probably a slight advantage to using a 3-prong plug. The bare end of the wire from the ground plug should go into the mass of steel. It is not worthwhile to ground both halves of the device. Perhaps you can liberate the cord from a junked appliance.
For safety, use the output section of a regular 2-prong extension cord which has a safety protrusion to deter anyone from plugging in a grounded plug. One reason you don't want anyone to plug in a 3 prong appliance is because the devices that have ground plugs will tend to draw more juice than the unit's wiring can handle.
If you decide not to use a ground, cut your extension cord in 2. I have a hunch that the wall socket end shouldn't be more than 36" long. Strip 1/4 to 3/8" of insulation off the ends if you are going to use butt splices (see mobius page).
One thing about using a 3-wire input cord with ground is that if you want the outer cord jacket to be neatly ensconced in resin, you will need to recast the entire unit when done.
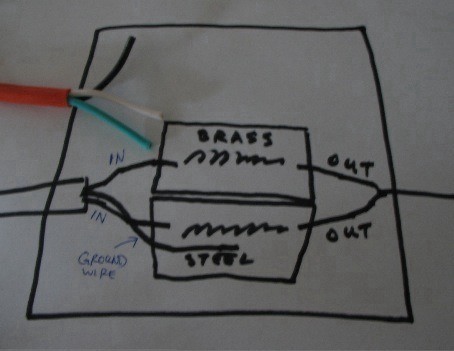
This is a crude diagram.
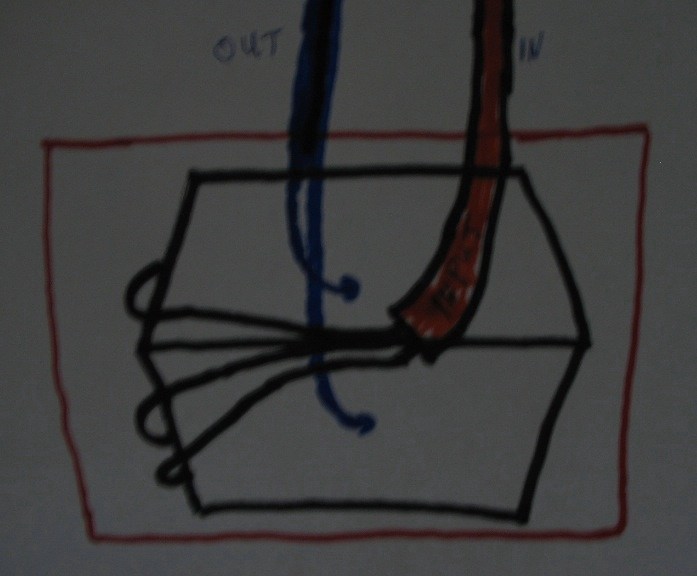
It should look more like this one below:
Here is what I've done:
1) Pour 3/8" or so clear resin into the bottoms of 2 1-quart yoghurt containers. Actually, pint cottage cheese containers would be better, as the others are too tall. I cut the top 1/2 off the quart molds.
I poured a shallower layer in one of the molds, let it harden, then put an extra steel coil in it. Then poured another thin layer to cover this first coil. This is for the steel half, to give it more energy driving upwards. Overall, the steel one probably has more clear stuff on the bottom than the brass one does.
Let this resin harden up.
Here are the coils that go inside the orgonite:
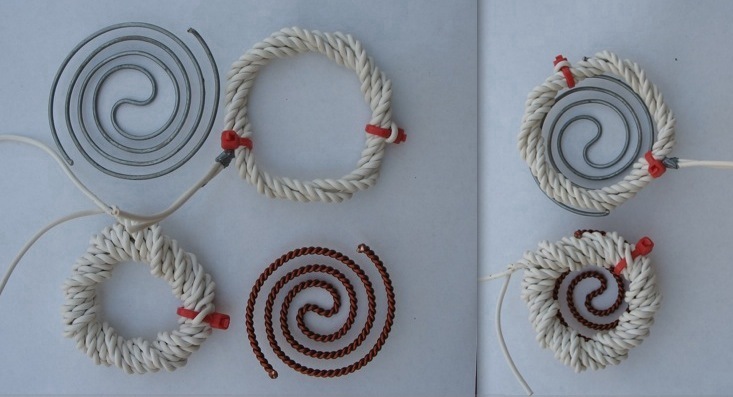
As described below:
2) (Optionally) Use a 26.65" SBB coil made of heavy steel wire, single-strand (doubled-twisted baling wire is a b%&#@! to work with) in the steel part, and a 17" coil made of copper wire on the brass side. See above for further notes about the coils.
3) Add a very small amount of aluminum, magnesium, and to the steel. Since I don't have zinc, I used my SE-5 to program zinc in.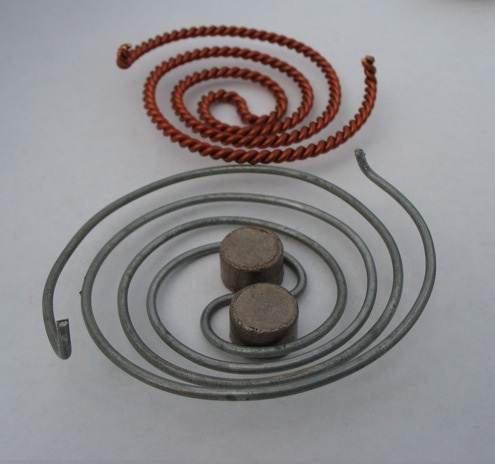
Put 2 bismuth slugs, + side up, in the wings of the steel coil.
Add a trace of Mg to the brass, also.
4) The 18awg coils: The one for the steel I made 6'4" not including the short leads, and the one for the brass 12'11". Twisted and wound like the ones in the last OTB.
The mobius coils should be attached to the cord wires in such a way that the junctions will be covered with orgonite, so the coil leads should be as short as possible. Ideally, the connections should be securely soldered, and taped over.
 But if one is not a soldering enthusiast, one could crimp with butt-splices, but then I recommend sealing the ends of the splices with tape or otherwise before pouring. Here I have used duct tape, as it is stickier than electrical tape. Snug it on there good. You want to be sure that the splices are securely crimped and taped or resin might seep in and act as an insulator.
One can see the "preliminary" embedded steel coil on the left.
Note: the splices I used were rated for 22-18 awg. However, they (just barely) worked even for the thicker wire on the grounded extension cord, which I think is 14awg. One just has to twist the strands tightly together.
Drill a hole (of the same diameter as the cord) in each mold at the height where the mobe will be. Actually, 2 holes, possibly of different diameters. Plus the mold you plan to put steel into gets a 3rd hole if you are using a ground. Push the wire into the hole from the outside. Then strip a bit off the end and solder or splice to the mobius. Before pouring resin, be sure to take some electrical or duct tape, cut partway through it, and tape over the edges of each hole from the outside to prevent seepage. I forgot to do this, but got lucky. My holes were snug enough to hold the resin in.
 As mobius coils also have one side that is more +, you will want to arrange these so that they buck upward.
The ground wire is green. I stripped more insulation off that one, and wrapped the bare end around a piece of steel turning.
[See also note on polarity in the April 19 update.]
 5) One nice thing about lathe turnings is that they enable one to position different components before pouring. I admit it was a bit challenging to place everything in the steel unit, though. Could have used smaller pieces of steel. The steel one got not only an SBB coil and a larger-diameter mobius, but also 2 bismuth slugs, 2 small Apache tears, 2 small snowflake obsidians, and a cheap pearl. Also some selenite shards (not sure selenite helps on the brass part). Some of the selenite was in small "wands" arranged to shoot energy upward.
The brass half got the one copper coil and a large roundish Apache tear.
To the resin, I added some qtz beach sand and a dollop of sindhooram.
Also added a dab of antimony to each unit on the very top of the last pour as it was partly congealed. Antimony used this way helps direct energy upward. Use less on the brass part.
Quartz sand or powder acts the same way, so I sprinkled some nice sand on top of the antimony.
Trying to maximimize the bucking factor.
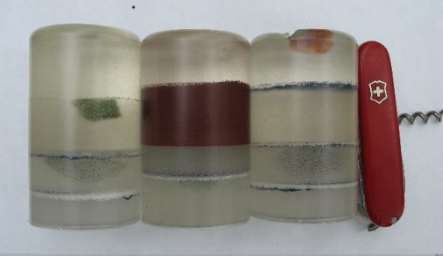
 Steel Shavings tend to be too coarse to use, but also brittle. Especially when burnt to a dark blue by the heat of the lathe. (The cigarette lighter is just shown for scale.) I place the metal in a box, put on boots, and stomp repeatedly. Some breaks up. I lift off the large springy stuff, leaving what's usable. I also put on leather gloves to break stuff up. This batch here is still a bit too coarse.
I had not used steel in a couple years, and had forgotten how good it is. Always add a small amount of aluminum if available. For this unit, I did not want to obscure the inherent vibe of the steel too much, so I just put in maybe 1/4 of 1%, maybe less.
Of key importance when making any resin-based device is to bombard the resin (and other components) with good energies while it is setting up. Make etheric orgone balls and visualize them stuffing into the unit from all sides. Program intended function into it. If you have a radionics device, target your project with that. Send frequencies of rare metals, minerals, herbs, etc. and qualities that you believe will augment the effectiveness.
You can bombard it with sound or send Hz frequencies to it with radionics. One nice freq I dowsed and have used with the NCH Toner (download) in the past is 33687.3 Hz. Just now I dowsed it to 5 decimal places to put on the radionics machine, but I won't give them because they will vary for different people in different locations.
And while you got the vibe on the dial box, send a nice long blast to any nasty entities you're aware of.
 April 15, '07: Forget re-casting, I like it the way it is.
The orange color is due to a couple teaspoons of sindhooram. Makes it color-coordinated with the jacket of the extension cord.
[Update 6/07: I just learned that Sindhooram, Sindur, etc. consists mainly of lead oxides. Use caution in handling.]
It's kind of scary what one can do with this. One can stack a module like this with the orgone devices one has running off a radionics machine, and it will hijack the local grid as an antenna and broadcast your trend. Right now I have ANTI-INSECTILE DEMONS typed into my SE-5 unit's computer at home. Have had for days. One can run general trends like this, really a freq specification more than a trend, for a long time with benefit. Without the operator knowing more details, the radionics device will spit out the best anti-insectile freq. In this particular case, the freq is also highly annoying to greys and repts, but not other species. It hits everywhere in all 6 universes with the same force as if one targetted a narrower area.
Last night I plugged this orange unit into my wall at home. I'm off-grid, but have 110 wiring for when I run my gas generator. Since I wasn't running the genny, I shorted the output ends of the gridblaster to make a complete loop. I placed the device on the extension plate of the SE-5 to boost the SE-5, then later realized it was making all my wiring radiate the freq. And the generator which is 30' away from the house, connected by underground wire. And the 12v wiring in the cabin also radiated the same freq due to proximity and sympathetic vibration. Then I mentally inserted my other gridblaster (in town) into the orange one, connecting that one to the SE-5 output, too. This made the local grid also radiate the freq. And very strongly at that. And all appliances that are plugged into the grid, even if turned off. Not to mention the Russelville nuke plant. I don't know why it's doing the nuke and Russelville, but not other towns close to me. It's not as dominant in Russelville as it is here, though.
This morning at work I have the orange one plugged into the grid, too, and both units mentally connected to the orgonite on my SE-5 plate at home. Works great.
April 19, '07: That nuke plant sure is sweet lately, as nuke plants go.
Yesterday something occurred to me that I had forgotten about: in the US, AC jacks and many plugs have one slot/prong that is taller than the other. If this "polarity" is reversed, some appliances will not work. I had screwed up the polarity when I built my 2nd unit. (I couldn't on the first because I never cut the cord, or I would have, guaranteed.)
I think, the white cord should have gone to the brown cord that comes from the taller slot. The taller slot is on the left side of wall jacks, and by convention the white cord in house wiring also goes to the left. There are little testers one could buy at hardware stores to check jack polarity. Though most small things one might plug into a gridblaster will work regardless. And if I ever really care, I can cut the brown cords, reverse the relationship, and re-attach the cut ends.
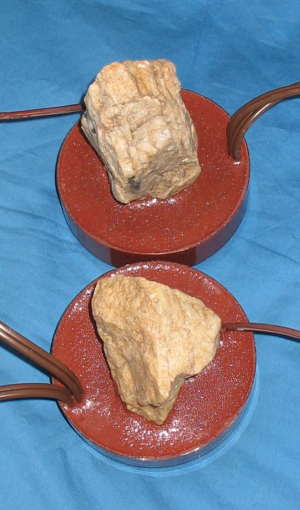
May 5, '07: A friend sent in a pic of a gridblaster he made. He didn't have all the ingredients I used, but did his best, and it turned out pretty darn good. The California towns of Bakersfield, Fresno, and even west to San Luis Obispo have their grids all sweetened up now. LA kind of does, but I suspect that is due to things some locals there have been doing.
He couldn't come up with brass, but used cut-up copper scrub pads and wire instead. He did use obsidian in the coils. Zinc-coated BB's with the steel. A bit of magnesium, and he sprinkled some sand on top.
His appears significantly larger than mine. My orange one is less than 3 & 3/8" tall, and less than 3 & 3/4" wide. There is no reason not to make these things as big as you please, but for those in countries where resin is very expensive, let me assure you that they do not need to be huge, either.
Incidentally, it appears that the effect only gets stronger the more one keeps these things plugged in. Sure shows no signs of weakening, anyway.
 Jan. 13, '08: Piping in the strong stuff: I silicone-glued a clearcast muffin containing a piece of aluminum honeycomb onto my 2nd grid-blaster, then drilled a hole in the side of the muffin to accept a plug to pipe in radionics/orgone output. This is really worthwhile if you have some powerful hardware to plug in.
 Here is a mini grid-blaster with very special programming which is further described in OTB 27.
An extension cord was doubled over and the end taped together with, as it happened, silver-coated copper tape, and a ferrite toroid slipped around it, which sits at about a 45 degree angle. And this was cast in my best "multidimensional" mix based on magnetite, iron oxide red, and hematite. There is a binding post coming out the side to pipe in output from larger devices. The post hits the internal toroid. This thing rips, due mainly to the program.
Mar. 31, '08: Grid-blasting made easier:
 One can just tape 3 cylindrical units around a cord into a Trinity formation, as shown here. This one is added to the cord on my orange unit. It is 3 copies of the grid program, each made attuned to one of my astral allies, as each person can only have one copy of the program. But, one could instead have one of the grid program, one of the anti-chemtrail program, and one of the general anti-evil program, for instance.
One could imbed an input wire into one of them, and/or wrap the 3 with a mobius coil, and tape it on. I strongly advocate pumping extra orgone into such devices. I just have this simple setup here because it is part of a powerful grid-blaster unit that does get external boosting into the orange part.
But it gets even easier. If you even leave an orgone device or programmed stone sitting in an operating fridge, freezer, or on top of an electric water heater, it will also be taken up into the grid. And with the strong programs offered here, this is quite effective.
If you have a building with exposed metal conduit around the lines, and/or a protruding breaker box, something can be set on this.
Also, remote grid blasting is quite feasible given some orgone power, as mentioned March 24 in my blog. Incidentally, the amp mentioned there is very well-suited for feeding extra energies into grid-blasters for extreme impact.
 Another weird thing about this grid program (which might not be as true for other programs) is that it treats radio waves like wires, kind of. Meaning it's just another grid to it.
I live off-grid, but have one of these brown cylinders in my wireless LAN radio mount, so anytime I upload anything to the internet, I blast parts of the internet.
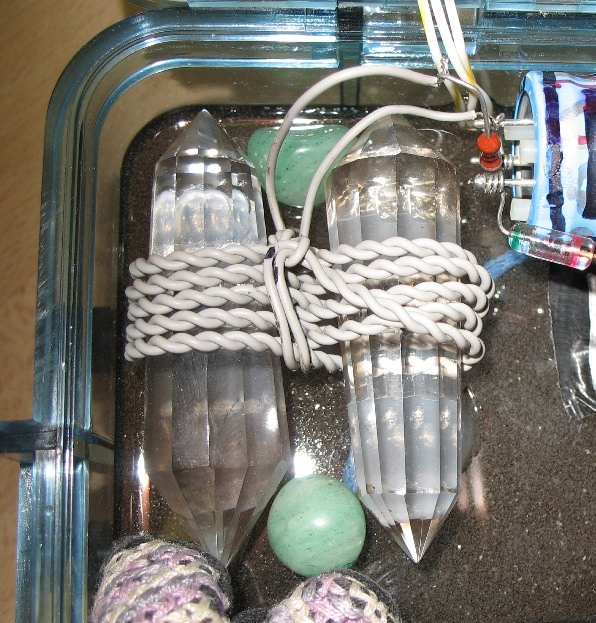
And after I uploaded this pic the other day of my tandem grid-blaster crystals, I realized that the pic is busting the web, too. Just sitting in the server, its "infection" spreads powerfully from there. Because the pic is linked to the orgone device. And every time someone in some part of the world opens one of the pages on my site that has this pic, it busts the www from my server to their 'puter. And incidentally infects the electric grids, too. And a lot of these people work for the government and are here to help us.
Now, this is part of a very powerful and complex unit that is well-suited for remote work, but this holds true to some extent with any pic of this program, as well as who-knows-what other programs might do this to various extents.
April 4, '08: A reader asked me
"When adding a plug to pump in major orgone, can you just set a plug in the resin and allow it to cure? Or do you need to connect it to a coiled crystal, or something?"
Either is good. You might be able to dowse the best place to put it in. You can't go wrong just sticking it in anywhere, especially if it's into metal shavings, but it might be better touching an internal component like a screen, coil, gemstone, etc. or a selected dynamic microphone element.
If you are wanting it to be part of an electrified loop, have both ends of the mobius sticking out.
Consider the issue of strain relief on the wire. You can use a banana jack (for 1 wire) after plugging the rear end so resin doesn't get it. Or a binding post. Or just have a thick-gauge braided insulated bit of wire sticking out, and put a connector on it for a thinner wire. Or just use thick extension cord wire as your entire cord.
 April 24, '08: I no longer advocate splicing mobius coils into the extension cord wires. A much simpler interface is just as effective. Plus, anytime you create a joint in the wire, you probably create a weak spot that would be the first to blow out should too much current go through it. The gridblasters shown at the top of this page work great (just be careful not to plug too much into them) but are unnecessarily complex.
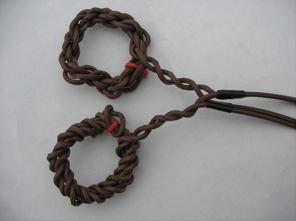
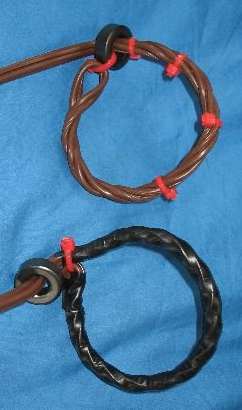 I recently made a couple simple gridblasters for friends. I simply hand-twisted a section of each cord into a crude mobius coil. I incorporated ferrite toroids, which are not necessary, but ferrite is used in electronics to suppress undesired EMF fields and suchlike noise.
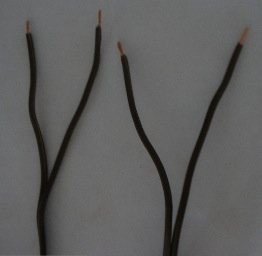
I tried securing the coils in 2 different ways. I prefer the 2nd one, merely taping the coil so it doesn't unwind.
I put 2 square pieces of hardware cloth (see March 3, '08 entry in OTB 28) in each, one just under and one just over the coil. This jazzes it up. One of these screens had a wire worked into it and is left sticking out of the top of the finished item as you can see on the right side. This is for piping in rad/orgone output from other devices, a highly-recommended practice.
First I poured a thin layer in each mold, using a mix of 1 part dark rutile powder with 5-6 parts iron oxide red. This is a great mix I just recently discovered.
After that hardened, I laid down the first screen in each. These had the auxiliary wires coming out. Then I set the coils on top of those, and poured more mix to just come to the top of the coils. As this hardened, I had Pitwexin (see OTB 27) program them with the "grid program". Each person can only have one copy of this program, so if you want more, find some consenting friends to attune the program to.
When that was hard, I added the 2nd set of screens, and poured another layer. Immediately I set a little heap of copper shavings in the middle to act as a bed, then the quartzite on top of this. I was using molds several inches tall, which allowed me to put paper towels as padding around the rocks so that the mold would hold them in position as the epoxy cured.
I had this epoxy layer programmed with the general anti-evil program.
Since there are 3 2-part programs in each unit, I buried 3 companion stones within each unit. In one case I used the toroid as the companion for the grid program.
The purpose of the big stone is to add even more power inexpensively, as I have a supply of this great quartzite I gathered. But one could use something else, perhaps an orgonite cone, instead, or nothing at all. But with those wires sticking out the top, I like to have something there above them to sort of protect the wires and make it look better.
The quartzites were programmed with the "anti-chemtrail" program, which may not do anything visibly, but is sort of an anti-evil program #2. Consider, too, that the grid you are hijacking has a lot of exposed high-tension wires, towers, etc. on it, which will transmit the energy to the sky.
A unit like this, plugged into the grid with some good stuff piped into it, makes a huge difference over an area of hundreds of square miles, I found on the map.
Then later I had Pitwexin add a "king grey" program (see April's blog) into each of these quartzites for extra punch against reptilians and tall greys.
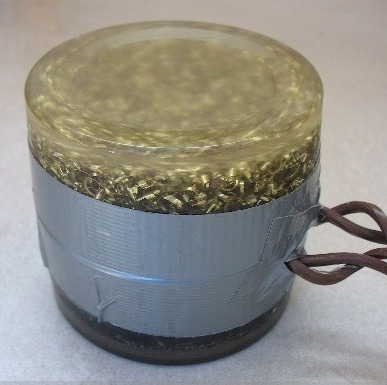
 May 11, '08: Here's a different kind of grid-blaster I made. It is put together as in the first pic of March 31, around a wire. Hopefully this one will be set up in India in a few months. Meanwhile, it is in KY.
It has numerous programs, each imbedded as the epoxy cured. The dark band is the "grid program". For grins, I put pieces of hardware cloth as dividers between programs. Adds zing.
One merely wraps an input wire around the midsection if one wants to pipe in auxiliary stuff.
It is extremely powerful. The owner already had a grid-blaster on his electric line, so he put this one on his satellite antenna. I guess it does help a lot to put it directly onto the desired grid. When he first told me what he'd done, I noticed that it had sucked 2 satellites into its orbit, so to speak. They were re-radiating all the programs (I suspect the others piggyback on top of the grid program) to TVs and probably much more broad a target than that.
Today, there are 8 satellites that have been hijacked. They are broadcasting this stuff with remarkable power. And I don't think he's even piping anything into the blaster.
Loohan
next OTB