 home coil info products ordering
Loohan Communications Office
Orgone Technical Bulletin #40
started Sep., 2011
Misc. Tech Ramblings #3
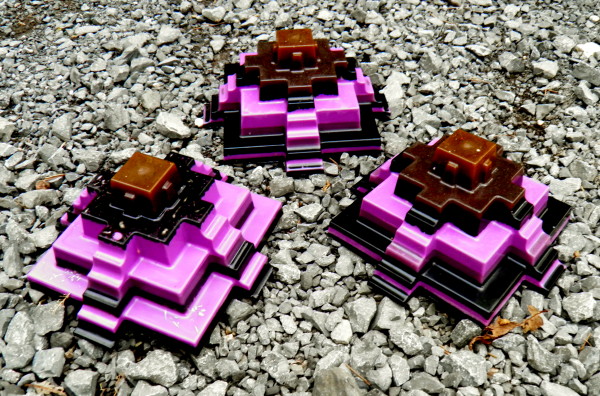
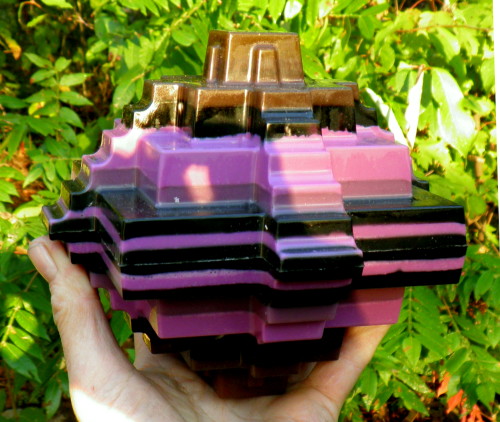
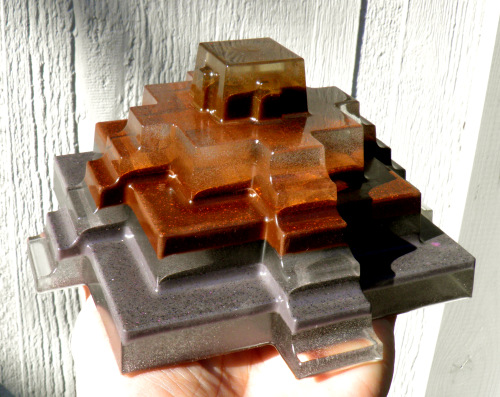 Sep. 15, '11: Awesome Pyramid Molds.
These are commercially-available flexible plastic molds a friend in Utah made me aware of. There are 2 kinds: a conventional pyramid, and a Mayan pyramid.
At this time I have only made 1, with the Mayan mold, which I think I like better than the conventional. It seems to have superior energy. Even the empty mold can be used as an energy device.
These are also available from other vendors, some may be slightly cheaper, but at the time I checked, all the others only carried one of the styles, so I would have had to pay shipping twice ordering from others to get both styles.
In order to shoot themselves in the foot, and make these less popular as molds, Educo cleverly chose to emboss its name on the inside of the molds. However, this can be more or less removed with adroit use of a single-edged razor blade.
Lubrication and de-molding: I use epoxy, which tends to be clingier than polyester resin, as it does not shrink as much when curing. I chose the lazy path, and simply sprayed the interior of the mold well with WD-40, then set it rightside-up for a few minutes to drain off the excess. [Update: I do recommend WD-40 for this mold. The ones in which I used pan spray instead don't want to release!]
I did 8 pours, coming up to about 3/16" from the top of the mold. I let things stand for 2-3 days, as that makes the slow-setting epoxy come out more easily. I gently pulled the edges of the mold away from the bottom of the piece, and turned it upside-down on the hard floor. Pressed down a bit on the square tip, and the cast dropped right out cleanly!
If you screw up and fuse resin into to mold with excess heat, you could just leave the mold on, and use as is.
Also, either the cast piece or the exterior of the mold can be painted with metallic paints that you should program as they cure.
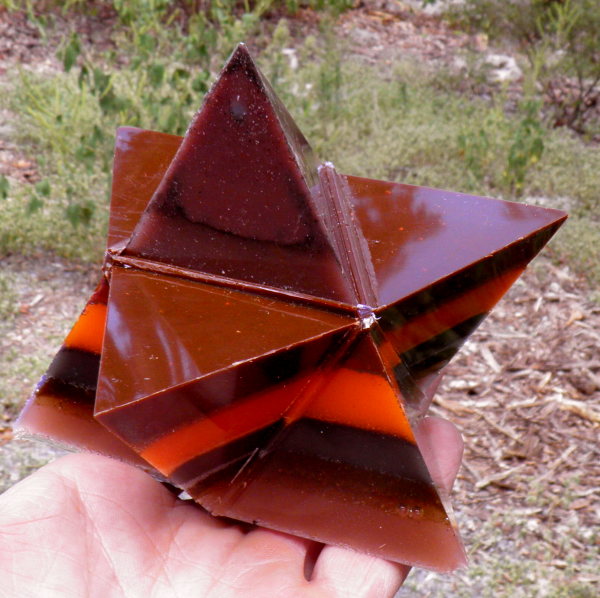
Sep. 27, '11: After doing 3 pours, I would have to highly recommend the Mayan molds. They really hold their shape well. The regular pyramids tend to have one side that bows in a bit.
The Mayan molds are one of my greatest discoveries. Even mediocre orgonite would be pretty good in these.
But here are some with non-mediocre fillings:

Oct. 25, '11: Stress-Relieved Polypropylene for molds: Last August a friend sent me some molds he had made out of sheet plastic.
 Here is something I made out of one of them. Here are some more.
Thus far I have not attempted to make molds with this stuff myself.
No lube is required, even with epoxy. And the molds take more heat than most plastic.
Some notes from him:Lately I have been researching to find a mold that won't stick to resin and that would be reusable. Right now they are all based with the triangle figure.
All is made from one piece of plastic and it does work very well. Hot glue is used to seal the edges. The glue is removed upon disassembly to remove cast. Mold is then reshaped re glued and then ready for next cast. 1...2...3. It's perfect. Sharp edges and clean shiny sides.
Get "stress relieved polypropylene".
1/32" Thickness is too small to work with, bends and deforms easily.
3/32" is perfect to use.
1/8" is very thin and very hard to work with. (not to mention cutting and shaping)
Polypropylene has a mind of it's own. The polymer is tight and sticky. The best way to handle it, is to melt it. That's how I make the folds. Because it's stress relieved, the folds can be bent back and fourth many times with out breaking. (This is what I desire.) A knife cut is hard to penetrate the sheet because if it's stickiness. I have broken many blades trying to score it. It is very hard to judge how deep you are cutting. That's when I came up with the idea of melting it.
My first way to melt a fold was to use the Butane soldering iron with the rope cutter blade and a metal ruler. This works good for off site main power. Then I chose to make my own soldering iron tip for the purpose.
This is the Butane soldering iron available from like a Lowes or Home Depot or something.
Once you have a score it's easy to run a sharp razor through.
My inspiration came from this site. I print the designs out and trace the lines through the plastic.
I find hot glue to make the best temporary hold before casting. Goop works too but the set time is slow. This holds the mold together and prevents leaks. When the cast is completed the hot glue is peeled from the plastic and the mold is carefully separated from the cast.
It really comes out seamless.
Removing mold: Take a pair of needle nose pliers or the like and turn off the glue in a turning motion like removing the lid off a can of sardines. It will also be easy if the hot glue is bone cold. Less tacky.
Some items he made: 1, 2, 3.
Note that I don't necessarily advocate going to all the trouble he did to make and pour into such complex molds as #3 especially. I don't find such elaborate shape necessary to get excellent orgone functions. But it is interesting what is possible. The mold he used for #3. I don't know how he got all the arms filled with resin.
March 29, '12: A note on positive and negative energy as it applies to my orgone devices and other things:- Regular orgonite, infused with nice mellow energies, tends to always feel mellow and sweet, whereas if programmed with anti-evil energies, seems DORy oftentimes.
- This is because the device is drawing in and processing bad energy. A dowser capable of such discernment should ask, what is this device taking in versus what is this device putting out. All my devices put out impeccably sweet energy, to the best of my knowledge, yet often feel a bit nasty due to the work they are immersed in. Orgonite that is deliberately corrupted with black magic, or is corrupted by demon interference during the curing process, will put out icky energy. Look at some of the products by Carol Croft, Sensei Dennis, and other shapeshifters such as Ernest in Bucharest. Well, he seems to have taken down the pix of his products after I outed him, but they were very DORy.
Note: The Committee attempts to reprogram such devices as much as possible, so they are actually no longer quite as bad as they were. - This does not only apply to orgonite. A few days ago a friend wrote me that he destroyed several Buddha statues because they were accursed. I did an image search and found a couple pix of black magic tainted statues, but most were fine. However, all were DORy because Siddartha Gautama still exists as a discarnate, higher-dimensional entity, and the darkside finds him intolerable and attacks statues of him. The fat buddhas are not DORy but the skinny ones are. Try discerning what they are putting out.
Oct. 1, '12: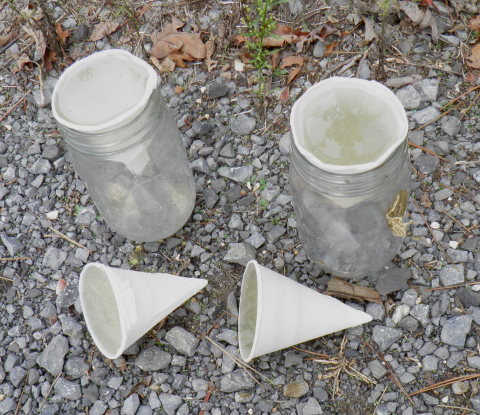 Things have progressed, and now I no longer feel much dirty energy on the skinny Buddhas. I feel more the strong energy of Gautama.
A minor tip I've been meaning to post for a couple years. If you use sufficiently acute-angled cone molds with sharp points, such as these common water cooler cups, the free Water-Charging Program takes on a different quality, making it much better for dry gifting. It doesn't make it better for water.
The thing to do is make sure the first pour gets the water pgm. These days the water pgm requires no additives; just plain resin programmed as it is poured and hardening.
I usually pour it about halfway up the height of the cone with one pour of epoxy, which gets the water pgm. Then put about 3 layers on top with other programs such as Strontium-Barium, Vicarah, or July 2012 pgms. These cones in the pic have only July 2012 in the top layers.
I use pint jars to support the cups when pouring.
Thus used, this pgm can add an intense positive orgone quality to the land better than in other shapes. For example, often when driving about in wooded areas, I toss stuff into creek beds that the road crosses at a culvert. My reasoning is, that, even when dry, these beds are a fairly safe place for the item to be in case of a brush fire. Also a creek bed is lower than the surface, thus less sun shines in. I try to toss in places where stuff won't get too much sun nor be too much at risk from fire. Unless there is an important target there with no ideal spots to gift.
I don't use these cones all that much, but occasionally I think it's good to add a bit of this frequency.
Also I like to keep a few of these around the workshop, because often when I'm working on a larger project I am guided to imbed one of these in it.
March, 2013: Doing your own programming: The single most important ingredient in an orgone device is the programming. We offer real great free programs, but sometimes people want to do their own thing. I thought I'd list some tips here.
Some people have genius higher selves that are good programmers, without resorting to any physical means like sound, symbols, etc. If you can do this, this is the best way to do your own programming. The higher self can sometimes draw from far future knowledge that you don't possess in the present.
But what if you can't access any genius higher selves? Here are some other ways to maximize the good energy in your devices. One or more can be used simultaneously. Programming of resin should be done while it hardens!- Radionics: even if you don't have a radionics device, you can easily make one with any good orgonite by embedding a piece of hardware cloth in it, or placing a piece under it (see OTB 28). Then write on a piece of paper the energies/intentions you want to permanently program into the resin of what you are making, indicate the target, and place this paper on or under the unit you are using for radionics. This will program not only the curing resin, but also any metal or stones in what you are making; however, these latter can also be reprogrammed later with something different if desired.
Some suggestions: write the names of precious metals like silver, gold, platinum. Herbs like salvia divinorum, tobacco, yage root. Frequencies like the Solfeggio frequencies (beware of altered Solfeggio frequencies such as promoted by CIA websites).
A good freq against evil ETs, shapeshifting reptilians, and demons is 335.8Hz. You can just write the Hz numbers on paper.
Also radionically implant intentions if desired. Such words as harmony, balance, serendipity, love, are good. Or "repel all bad energies" "drain the energy of evil people", "neutralize all black magic", "disorient all attackers" should have some degree of effectiveness. - Also try mentally implanting such intentions into the unit you are making; you might find this pretty effective.
- Use a tone generator such as NCH Tone Generator (download; does not work in Windows7) or SineGen (download). Years ago I made some Solfeggio units using a pair of cheap headphones piping in the freqs from my laptop.
- Bombard the physical location of your project with positive energies such as from good orgone devices, Om symbols, etc.
- Sincere and fervent prayer to positive beings.
A warning: some people trust evil beings/symbols, and use those to program resin. These days, this is not as likely to mess you up too bad, though. But many "dieties" and gurus are darkside.
Also, stones and other ingredients sold by some vendors are corrupted and need to be cleared. See OTB 17. Also, in some rare cases, certain individuals still get targeted when crafting, such that whatever they make turns out corrupt. To avoid this, hang a pic of Ice over your work area. If you don't have a printer, you can still summon Ice.
Really, beginners could just pour plain resin and program it until they get good at it. A well-programmed piece of plain resin will have a pleasant amplitude of "chi" that many people can feel. So many people (not having understood certain fundamental points I that frequently emphasize in recent years) write me to tell me that they have such-and-such semiprecious stones, and such-and-such metal shavings, etc., and they want my advice on how to make something with this stuff; what kind of coil and which direction should they wind it. My advice is, save any of the pricier ingredients until you have more experience and intuition. Use simple ingredients at first, perhaps just plain resin, and concentrate on programming.
April 1, '13: Making sphere molds:
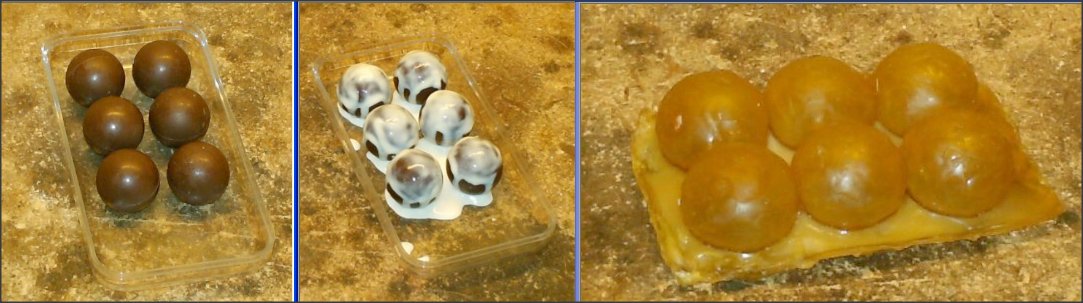
Pix courtesy of Sittingtaoist. I have not tried this yet. Use a high grade silicone mold-making product. I might suggest pouring a layer just before adding the spheres, to keep them from rolling.
Sittingtaoist used round pralines. The guy I got many pricey single molds from on eBay used wooden balls (as one can discern by the grain pattern). I suspect golf balls would work. Sometimes one can buy stone spheres cheaply.
Sittingtaoist made this mold with latex, which is a mistake. Do not use latex for resin molds. For one thing, it will not hold its shape unless very thick. Sittingtaoist's RF spheres turned out misshapen, but the pgm took fine. The mold is ruined after 1 use.
Rumor has it that ordinary silicone caulk like one buys at a hardware store will make good molds, but I have not tried it yet.
A friend of mine with experience saysOne could use bathroom caulk if done in thin layers takes forever. that is if you have time to make a mold. Weeks.
The latex, you can get a few casts out of it. maybe 6-8. Won't store well past a year.
Oomoo silicone from smooth-on. I would recommend 1:1 mix no vacuuming. And use the 30 hardness unless you are making something with a lot of detail.
BTW, this guy is a friend of mine who sells very high-end molds and other cool stuff on Etsy. He has sent me some awesome molds which I will be trying out one of these days.
[Update: I am no longer using or recommending Smooth-On products, for reasons I will explain below.]
June 2013: More on molds:
That type of silicone will not make a mold that lasts more than a few uses before tearing. To make a high-quality silicone mold requires an expensive grade silicone, a scale to measure it, and a vacuum chamber (instructions).
I personally have not yet made any silicone molds, and I doubt I will invest in the equipment to make top-quality ones.
But I have ordered a gallon of Poyo putty. It is expensive but of relatively good quality, hopefully, and easy to use without equipment. The tearing strength is rated as 85 pli (whatever that is) compared with 40 pli for the Oomoo, and 100 pli for the 40-hardness stuff my friend uses.
[Update: I am no longer using or recommending Smooth-On products, for reasons I will explain below.]
Also recently I bought a very reasonably-priced sphere mold which I have only tried once so far, but it seems pretty good. It is made in China but seems to be good quality, first impression. I ordered 3 more. [Update: they are very good and I have bought more of their sphere molds in various sizes.]
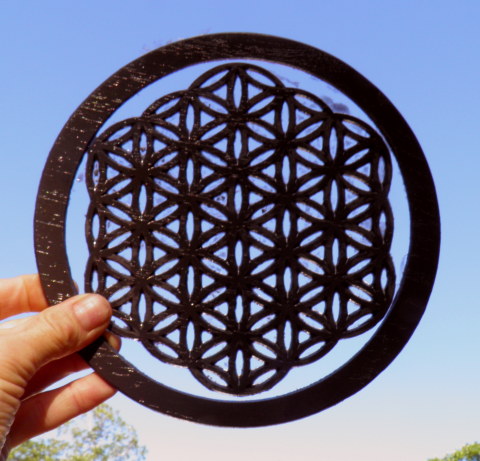 A pricey but useful mold is the Flower of Life mold sold by my friend on Etsy. He sent me one for free that had some insignificant imperfections, and I have been making lots of casts with it. A few tips if you get one:
- I made sure I had an impeccably level surface for the mold. It is a very shallow mold, requiring only 1 pour. To be sure the cast turns out even, I placed a short board on my table and, using a level, shimmed up the sides with newspaper until it was as level as I could make it.
- Pour a bit of resin mix in the FOL section only at first. Use a piece of cardboard as a squeegee to evenly fill the FOL imprint with no excess. Excess will be scraped into the ring section.
- Finish filling the outer ring, but don't let it overflow.
- After you remove cast, it may still be a bit malleable. Set on flat surface a few days if necessary to rigidify.
- Use an X-acto knife to remove the thin film that will be in between some of the lines of the FOL. Takes 5-10 minutes of work. This is for aesthetics. The FOL can also be imbedded within a larger creation, in which case you could skip the trimming.
(This turtle has my first FOL cast under its carapace. I wish I had painted the trimmed FOL with a light color to make it more noticeable.) - Save the rings and stack them to make a torus that serves as the skeleton for a ring coil.
- So far I have only used the new PRG program in these, using epoxy with some titanium powder mix. This program seems excellent for this.
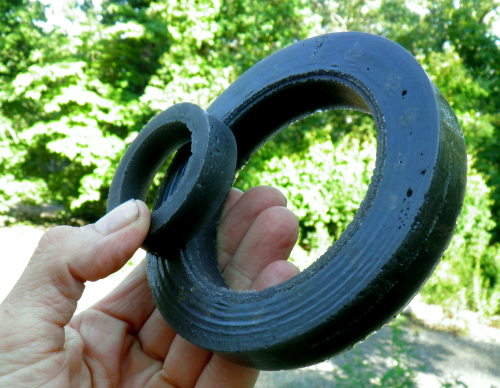 Torus or ring molds: Already years ago I had an interest in wrapping wires around epoxy toroids. Problem is, the molds I had available were less than ideal. The ring in this pic is too thick in relation to its diameter for making stuff I was guided to make.
So recently I had my friend make me a high-quality mold that makes 2 rings. He used rolls of tape as the rings. Strapping tape works well. He may or may not make more such molds, as the texture of the tape makes it look less than professional. But it's fine for our purposes.
You can make your own mold, of course, but then I would caution against making one with a square cross-section like these, unless you are using the highest-quality silicone/techniques. Because it puts a fair bit of stress on the mold to pull out a ring with parallel sides. I would advise using a ring with a rounded cross-section to make the mold, which would allow for easy release. Let me know if you find any commonly-available objects suited to this.
A mold that would work very well for us is here, however it is out of stock. So I ordered one of these. Very pricey; $117 with shipping.
 And the one they sent is not as depicted on their site at this time. It makes more tori, but shallower ones. These are only about 5/16" tall. But one could also stack them to make deeper tori. I made all those rings on my first cast with it. Also one can make some small disks.
Pic of some current torus projects. Many of these will probably later be cast in resin. The large one is made from 5 of the outer rings from the FOL mold, stacked.
These days I use much more tape than wire in "coils"; primarily tape with a UL181 B-FX designation. But I don't recommend doing that except for those few who are able to properly program tape:My impression is that a short piece of this tape might have 5 different programs
threading around each other like a maze or circuit board. This type of
programming requires a great deal of work, then is constantly being improved,
requiring more work by Committee members. Meaning, even if a crafter has the
skills and character qualifications to make such wands, they may not be guided
to, or guided to make as many, due to the limits of how much time The Committee
can spend.
Actually, this type of programming (tiny threads of programs juxtaposed in
maze-like patterns) is not limited to this tape. It can be done to any metal or
natural crystal, often greatly increasing the power of the item.
In an effort to get more of this programming out there, Chemmerbuster has communicated with the higher selves of 2 readers, and taught them how to do
this sort of programming themselves.
As I type this on June 24, there are now 18 individuals with this training.
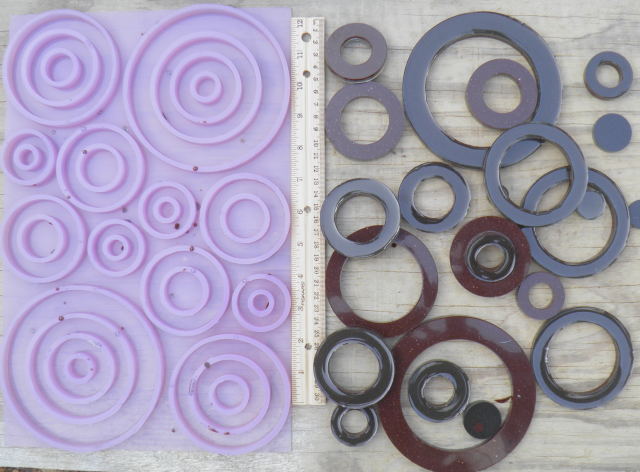
July 2013: Yet more on molds:
 OK, I made some molds with that Poyo stuff.
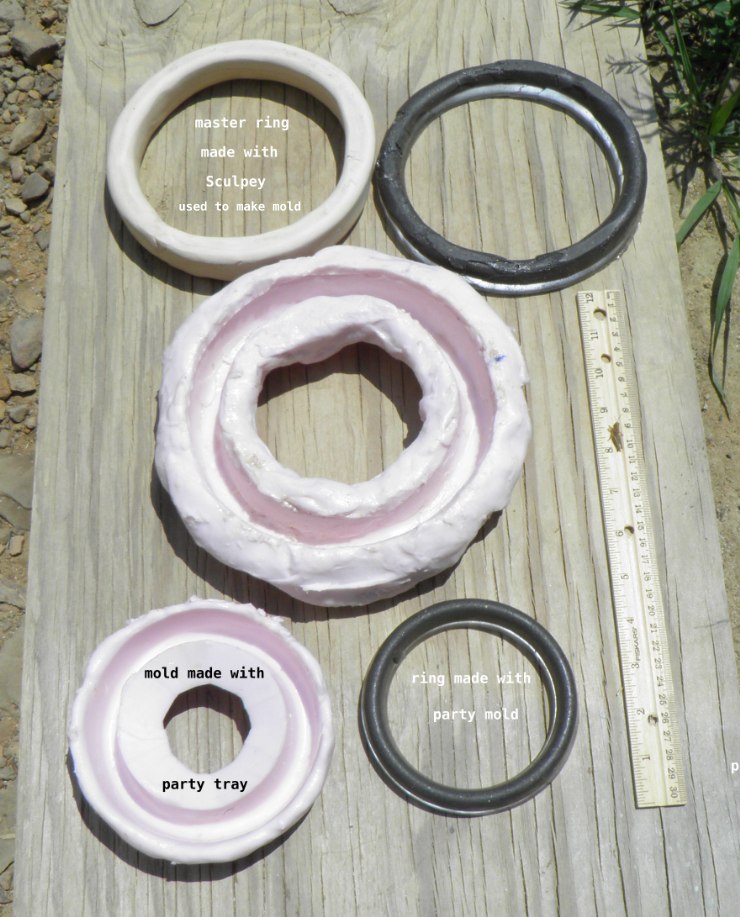
I realized I could use the ring in a salsa dip party tray to make a nice ring mold.
Also I made a ring out of Sculpey clay (Wartmall sells it) which gets baked to make it rigid. And I used this to make a mold.
Note: Sculpey is a polymer clay.
"Polymer clay safety is the subject of concern specifically the long-term effects of exposure to certain phthalate plasticizers that have been classified as endocrine disruptors. Plasticizers remain in the cured product and can leach out, making it a potential health hazard for both the modeler and end user."
The finished epoxy ring is kind of rough-looking, but just fine for my purposes.
Now for some pointers regarding this Poyo putty I used:- I bought the gallon size thinking it would last me a while, but the instructions say to store at 73 F and use quickly, as the raw product degrades with age. I presume this is also true of other mold silicones.
- The instructions say to work the putty at 73 F. I tried it once when the room and clay had been allowed to get up to 78. The problem was, when it's warm like that it sticks very strongly to the gloves, making it very difficult to kneed. Also the working time is shortened.
- I wore black neoprene gloves. I would not try this with flimsy disposable gloves as this sticky stuff would probably tear them up. Even at 73 F it is pretty sticky and challenging to kneed.
- If your new mold has a thin area, you can take more of the putty and stick it on to beef it up. It sticks well to itself.
- There is a tendency for little bubbles or hollows to end up on the inner surface of the mold. Even using a very smooth object as the master. The smaller ring in the pic has a couple warts. Again, this is no problem for my intended usage. But if I were intent on producing a neat mold, I would be very careful to try to get the entire surface of the master object in contact with the putty.
If you try to patch a bubble by putting more putty on the inner surface of the cured mold, that will work but leave a rough area as you won't be able to smooth it out well. - This product seems very forgiving of variations in the ratio of the 2 components. I made one mold with putty that had too little catalyst, and it took many hours to harden, but seems to be fine.
- It is difficult, using this putty, to make a mold that sits level. You may need to shim up one side of it before pouring resin.
- All in all, I consider this a practical compound for making useful shapes where cosmetics are not important.
Only for people with reasonably strong hands and arms.
[Update: I am no longer using or recommending Smooth-On products, for reasons I will explain below.]
Now, some pointers about making masters with Sculpey:- The Poyo instructions caution against using sulfur-based clays which interfere with silicone hardening, unless you paint them. Apparently Sculpey is OK, as the large master ring did not get sealed, and the mold turned out OK. Also Sculpey has no sulfur smell.
- Make your master a lot deeper than the height of the rings you eventually will cast. This leaves you room to sand down rough edges, and make a deeper mold that doesn't need to be filled to the top.
- You may be tempted to use unbaked Sculpey directly as a mold, as, unlike Plasticine (modeling clay), it does not melt with heat. I tried this once using, as a master, a faux crystal made of smooth glass. The clay really sticks to the hardened epoxy. It took a lot of effort to get the clay off. And it leaves a very matte surface.
(Recently I tried making a Poyo mold with the same crystal, but got air pockets on the inner surface.)
August, 2013: Lately I realized that with the Kleer-Kote epoxy I use, which takes hours to harden (unless it's pretty warm), I can remove the cast resin/powder mix from the mold when it's still somewhat soft. At least when using silicon molds designed to release easily. I have not tried other molds yet with this technique.
The glob of resin releases completely when it is about like modeling clay in consistency (or even looser, or stiffer) and various things could be done with this. So far I have only used this to make long strands of "clay" which I incorporate into a large ring coil I am making. The diameter of the coil is larger than any of my ring molds, so I used a wire Spurling-type ring as the skeleton, which I wrapped with metallic tape, wire, and "worms" of resin mix. The programming of the soft epoxy (by The Committee) continues to happen and is not affected by this physical manipulation.
I wear plastic disposable gloves when handling soft epoxy, as epoxy is largely BPA.
I tried making some Rolling Vicarah balls with soft epoxy. Very tricky. If you are able to catch the epoxy at just the right moment, it might work out. I caught it a little bit too soft. So the spheres I rolled out would flatten from gravity before hardening. I picked them up and re-shaped them about 3 times, but still about 60% lost too much of their roundness. When that happens, they get the plain Vicarah pgm without the rolling aspect. And only a sensitive can tell for sure which ones turned out RV.
A better idea for spheres: hardware stores sell epoxy putty. One can easily roll this into balls that keep their shape, and get the free Rolling Vicarah pgm. Be sure you are connected to The Committee before you roll. Use suitable gloves, as epoxy is largely BPA.
The spheres harden up in 1/2 hour. Any size at least 1/4" in diameter will take the program. Even if you can pour, this is a nice way to make small spheres that can be incorporated in wands, coils, etc.
Don't drill holes to make necklace beads, as that will ruin this pgm.
* * *
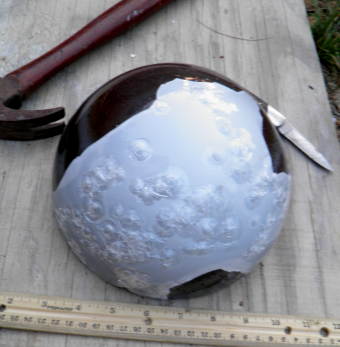 Back to pouring liquid epoxy: I tried making a big Rolling Vicarah ball with a glass globe sold for light fixtures. I used an unusually large globe, 7.5" diameter. But the tension on the thin glass from the contracting epoxy caused it to shatter. What happened is, I lifted up the globe by inserting my fingers into the top hole, to inspect it in the morning, set it back down on its stand, and a couple minutes later the snapping and popping noises started, and little chunks of glass blew out in a strange way. Luckily I had not poured in fresh epoxy yet. Also luckily, there was enough of a sphere already formed to enable the rolling aspect of the RV pgm; otherwise I would have been left with just ordinary Vicarah pgm functions.
Things that contributed to the breakage:- Oversized globe; perhaps a smaller one would be safer.
- I was in a hurry, and had been pouring somewhat generous layers that heated up and then shrank slightly. Perhaps if I had poured thin layers instead there would have been less stress.
 Using a hammer and a knife, I removed as much of the glass as I easily could. I had expected the glass to stick to the epoxy, so it wasn't a disappointment.
You can see the spots I tapped with a hammer, attempting to loosen the glass.
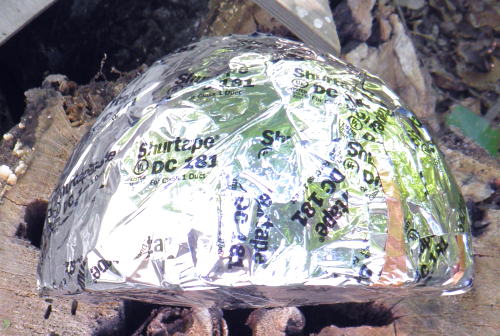
Then I wrapped the thing in tape which gets programmed.
As you can see, it is slightly more than a hemisphere. Anything over around 55% of a sphere will allow the rolling aspect (if you are getting the RV pgm). I barely made it.
Then I re-cast the mess in a bucket.
Some notes in case you try casting in a glass globe:- Use a smaller globe.
- I used only WD-40 for lube; perhaps auto polish would have allowed the glass to release.
- I used epoxy, which sticks more to glass, but also shrinks much less than polyester resin. Possibly polyester would break loose from the glass surface as it shrinks, thereby avoiding breakage; I don't know.
- Pour thin layers.
- If you want the Rolling Vicarah pgm, do not put in crystals, coils, BBs, etc. Only powders, metal shavings, and glitter are OK. This piece has some shavings, mainly coarse steel.
- Worst case scenario, the globe might break with runny resin in it, creating a big mess. It would seem prudent to have something underneath to catch any slop.
- It occurs to me that it would be a good idea to wrap the globe with duct tape beforehand, to re-inforce the glass.
But I doubt I'll be messing with glass globes again. Now I am working on another 6-qt halloween pumpkin. Not a sentient one; I have been wanting to make a sentient Rolling Vicarah unit, but haven't gotten a green light on that. I still have several of these Halloween things I bought a couple years ago. They are round enough for this pgm, unbreakable, big, and very cheap.
* * *
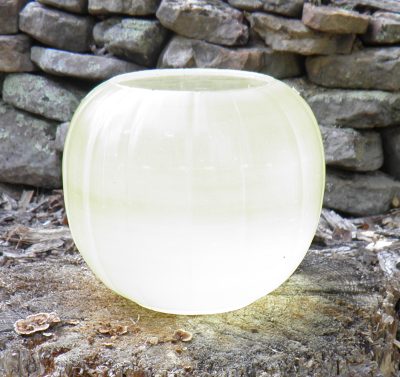 Here's my new 6-quart Rolling Vicarah ball, made from a plastic jack-o-lantern. I did not tweak the color or brightness; that glow is how it happens to direct the evening sun.
You can see how complex it can be to make an amazingly powerful and effective orgone item. No magnets, coils, stones, electronics. Shavings optional for this program. This ball has only epoxy.
Getting the plastic mold off it is a struggle, but if one were going to bury the unit, or toss it off the side of a boat, one could just leave the plastic on. If one wanted to make it less conspicuous to skin divers, one could paint the outside with grey primer.
 January, 2014: Update: I am no longer using or recommending Smooth-On products. Because the people there are RUDE psychopaths [update: Egyptoids]. I have written them 3 times about their claim that their epoxy putty is safe to work with the hands. As far as I know, all epoxy is based on BPA.
They have not replied. They did respond (non-sequiturly) without replying to my first inquiry on this matter.
They are contemptuous criminals, even toward a customer who gave them free advertising.
BPA is carcinogenic, which they specifically claim their epoxy is not, yet they stonewall all questions about BPA. It is also gender-bending, etc.
April, 2014: Another decent ring mold: 6-Cavity Donuts Round RING Chocolate Jelly Cookies Baking Soap Silicone Mold. Makes smallish rings, 75mm diameter which is 2 and 15/16 inches. Flip it upside down and make pocket disks.
Loohan
next OTB