 home coil info products ordering
Loohan Communications Office
Orgone Technical Bulletin #9
started Feb. 27, 2004
Written, Drawn, or Etched Stuff
and Eclectic Layering
Here is the succinct version of this page. The older, cumbersome historical version is now here. The older page has some bits of info not found on this page. Including the many people I am grateful to for providing the important pieces of technology that I have combined together here, most of which came to me from readers of this site who emailed me.
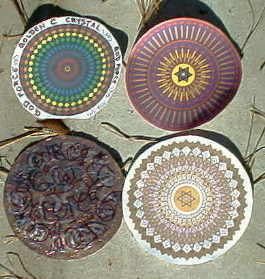
Copper Foil: If you take a piece of copper foil, and put certain words and symbols on it, you wind up with a very small but intense energy device. What I mainly use:GOD FORCEthe Reiki symbol described belowGOLDEN C CRYSTALthe OM symbolthe squared-off G symbol is handy for filling in little gaps.
Writing should be in capital letters. One should write/draw on both sides of the foil without regard to the indentations sticking up from the other side. If you want to direct energy toward the front when marking on the rear, put the symbols/words in mirror-image-wise.
Energy issues out the face of the words or symbols, unless they are made mirror-image-wise. Also, it issues out the faces of the labyrinths, etc., which is why I place these face down if I want energy to pack into something.
I find the best energy results from having GOD FORCE and the Reiki symbol dominant, but also including GOLDEN C CRYSTAL and the OM symbol, and even other little symbols I like. On larger items, I put little OM symbols and reiki symbols in any empty spots left on the foil after the bigger stuff has been done.
One can also write CLEAN SKY on them, along with the other stuff, and stuff them in one's CB pipes.
After one is done engraving on them with a ball-point pen, one should write on them with markers in various colors. I didn't think of this until Nov/1/04, so it is not yet depicted.
 The Reiki non-traditional dai-ko-myo. The symbol is drawn starting from the center of the spiral, outwards. Then the top piece is drawn from the edge of the spiral outward. Then the vertical line, etc. As far as I know, I have never received an attunement for this particular symbol, yet it is my favorite Reiki symbol. [In fact, probably about all other symbols used in western "Reiki" are black magic, and using them parasitizes the user.]
I use a ball-point pen. When making larger foil pieces, I wear a glove on my writing hand; otherwise that hand gets all smeared with ink.
I haven't tried it, but for smaller, fine items , one could use a machine to etch metal.
Eclectic Layering: Reich used to alternate organic and inorganic (roughly meaning, for our purposes, plastic/paper as organic, and metal as inorganic) layers to make orgone accumulators. However, this technology causes bad energy to accumulate, too, without cleaning it.
What I am advocating here is using this principle, but adding sacred symbols and words to the layer materials. You will need copper foil, available from such places as ssww.com. (Well, actually, you can get by with aluminum foil or aluminum tape. It is somewhat worth marking on aluminum tape, and I do when I use it now, but it is nothing like the copper for broadcasting the energy.) You will also need to read my bulletin on power graphics and print off some. Clear cellophane tape in wide packing width, is what I usually use these days for the inorganic layer. I also use narrow clear cellophane tape for tacking things in position before I tape over them. Scissors, a pen, and you're in business.
 If you make the foil pieces of the same size and shape as the pictures, you won't need to layer with tape. This is my preferred method when feasible. These items were amongst those I stacked into the unit below.
But I if I use labyrinths which may not be round, or may be smaller than the foil, I tape over them. I use small pieces of tape to tack things in position first.
I used to write/draw the words/symbols found by the top of this page on the back and front sides of many of these pics, but now I am trending toward just printing both sides of pics. Still, you can see I took advantage of the margin in the torus gif here.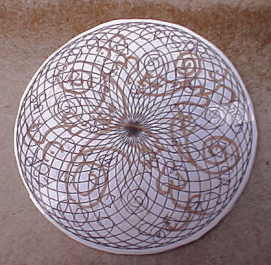
To the right is an older version of the torus. (Metallic Sharpie markers work very well, as they apparently have real metals in them.)
How many layers of pics to each layer of metal? I don't know if there's a set answer to that. I used to do 1 of each, then realized 2 pics was better and more cost- and time-effective. Now I'm tending to do a lot more than that. I just ordered jumbo amounts of refilling ink. I see no reason not to print off big stacks of pics, and occasionally insert a metal piece between them.
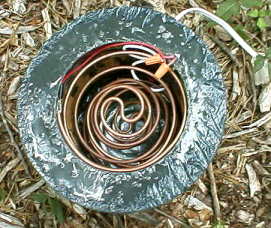 I took the coil out of this unit, and filled the orgonite shell with eclectic layering, etc. It is quite extreme. And one can always access the contents to modify things. I recommend this concept.
In fact, one could take just a plastic cylindrical container, and fill it with the layers. In the US, one can sometimes find Zinke Orchards almond butter in health food stores. It comes in a pint plastic container that is perfectly cylindrical. It is a bit translucent, but not bad, energetically. I see this as an upcoming project for me. Or maybe a metal can would work; I would make sure that an "organic" layer is outermost on the receptive end.
One would need to figure out what size pics to print off. One can determine the size in a graphics program, or just switch the numbers in the HTML code, if applicable. I will probably accumulate, over time, html pages for various sizes of discs that I may email on request.
My limited experience so far suggests, that in keeping with what we know about orgonite, it is better to have more concentrated metal near the top (if it is intended to have an upward direction) and more pics nearer the bottom, as the organic layer seems to draw in, and the metal radiate out more.
Note 10/24/04: I just read this and haven't quite digested it yet. But it probably has implications for the layering tech. "Galvanic batteries make no electricity, and are constructed of alternating layers of dissimilar metals, such as iron and zinc, in tall stacks." Hmmm...
Note 12/5: I now make a practice of alternating the metals (with printed graphics between each layer, of course).
Aluminum is not nearly as strongly radiant as copper, and with the tape, one can only mark on one side, versus 2 on copper. Plus, it's not worth getting quite as elaborate with aluminum as with copper. Nevertheless, there seems a decided energy-advantage to alternating this way. Aluminum tape is also cheaper and easier to inscribe than copper. One could also use aluminum foil, the thick kind. If too thin to write on with a pen, one can still draw on it with markers. Also, for personal items, it may be desirable to have the strong yang qualites of copper balanced with the yin aluminum.
Note of 11/23: Use discernment in choosing symbols and pictures! Don't blindly accept what I say, or anybody else, about what is a sacred power symbol.
Well-meaning people have emailed me pics and links of pics that are for healing, abundance, etc. Some of the "healing" pics didn't even have any particular good vibe to them that I could discern, others had "energy" yet I felt disinclined to use them. Others felt great.
In general, I prefer simple things that aren't likely to have hidden meanings, or symbols that just feel obviously sacred, like tori, shri yantras, Leedskalnin's Sweet Sixteen, labyrinths, etc. over complex magical paintings promoted by some.
If you are sensitive, you can modify, in a graphics program, a pic you like, like one of the mandalas here, and make it unique.
Note of 12/15/4: I just read a page I had seen before, but forgotten about, by Serge King: The Amazing Manabloc. Worth reading. Here's an excerpt:
...such things as spirals, stars, concentric circles, crosses, and mandalas. One of the most fascinating discoveries is that symbols like these, even when drawn or printed on paper, seem to generate energy, the same energy as pyramids or orgone devices. And they can produce all the same effects.
We first used a concentric symbol on the base of the resin Manabloc and it greatly increased the energy output. Next we found that the symbol would still work even if it was covered up.
Note of 1/15/5: Another great idea that works real well is to turn an accessible part of one's water line into a water charger: essentially, follow the instructions for a lakebuster but around the pipe instead of a bottle.
Projects:
Various applications and projects to stir your imagination can be found at this page. Graphics-intensive and less succinct. Unfortunately I didn't think of marking on the backs and fronts of the printed pictures until 9/13/4, so the earlier pics do not show this step. Nor had it occurred to me to mark on the copper with markers, after having already written on them with pens. And, unfortunately, these items are not nearly as powerful as they could have been. Further down, you will see the first of these neglected steps integrated into the construction.
Summary of tips:
Printed pics:Use the color graphics. Personalization is good. You can take the black-and-white checkered tori and put your own color sequence in it in any graphics program.You may also use your favorite labyrinths and other black-and-white drawings.Graviton the pics heavily!Print both sides of pic. If pic is asymmetrical (e.g. labyrinth) flip a copy mirror-image-wise and print that on the reverse. (Email me if you need html pages to print these so the sides match. I have a few.)I use plain paper and standard print setting.Use several layers of pics for each layer of metal.The paper is the "organic" layer; if directionality is desired, make a higher ratio of paper/metal on the butt end, and less paper separating the metal near the active end.directionality is also accomplished by the use of mirror-image pics on the reverse.
Cardboard:
Where structurally desirable, corrugated cardboard can be used. One side, usually the rougher one which faces inward on a box, is plus and the other side more minus. Cardboard can be made surprisingly strong with enough ink-work. Directionality is accomplished by the use of mirror-image markings on the reverse.
Cardboard, being a thick organic layer, is generally best used mainly on the intake surface of a directional unit. It can also come in handy where metal wool is used instead of foil.
Foil:Metal foil is good in any thickness that can be easily inscribed upon.Some foil may be about equally shiny on both sides, with scant directional difference. If you have foil that is rougher on one side, that is the receptive side.So far I have used only copper foil, aluminum tape, and aluminum foil. Copper is several times more powerful.But I still think it is better to alternate the 2 metals, as this seems more powerful (and cheaper) than just copper.I also have some hobby-shop aluminum foil that is coated with other metals and has an interesting vibe. I haven't worked with it yet. I did try writing on some brass foil, and that seemed pretty good. I believe I have seen silver-coated copper foil at online stained-glass suppliers, which is probably worth investigating.I take a ball-point and write and draw stuff on the foils, one symbol on top of another. Mirror-image on the back. Then, I take a fine colored marker (especially metallic with a different color than the foil) and draw another layer of symbol on each side. Then, when that dries, I take another colored marker, and draw over that. I do this with 4-5 colors in all.
It may be hard to believe, if one does not perceive energy, but, the energy level increases quite a bit with each layer of scribbling. Especially on the non-aluminum layers. So it's worth a bit of work.
Loohan
Projects next OTB